> ## Documentation Index
> Fetch the complete documentation index at: https://docs.citivus.com/llms.txt
> Use this file to discover all available pages before exploring further.
# Team management
> Invite teammates, assign roles, and control who has access to your Citivus workspace.
The **Team Management** page lets you invite collaborators, assign roles, and govern access across your workspace. You'll find it under **Settings > My Team** in the sidebar.
 ## Members table
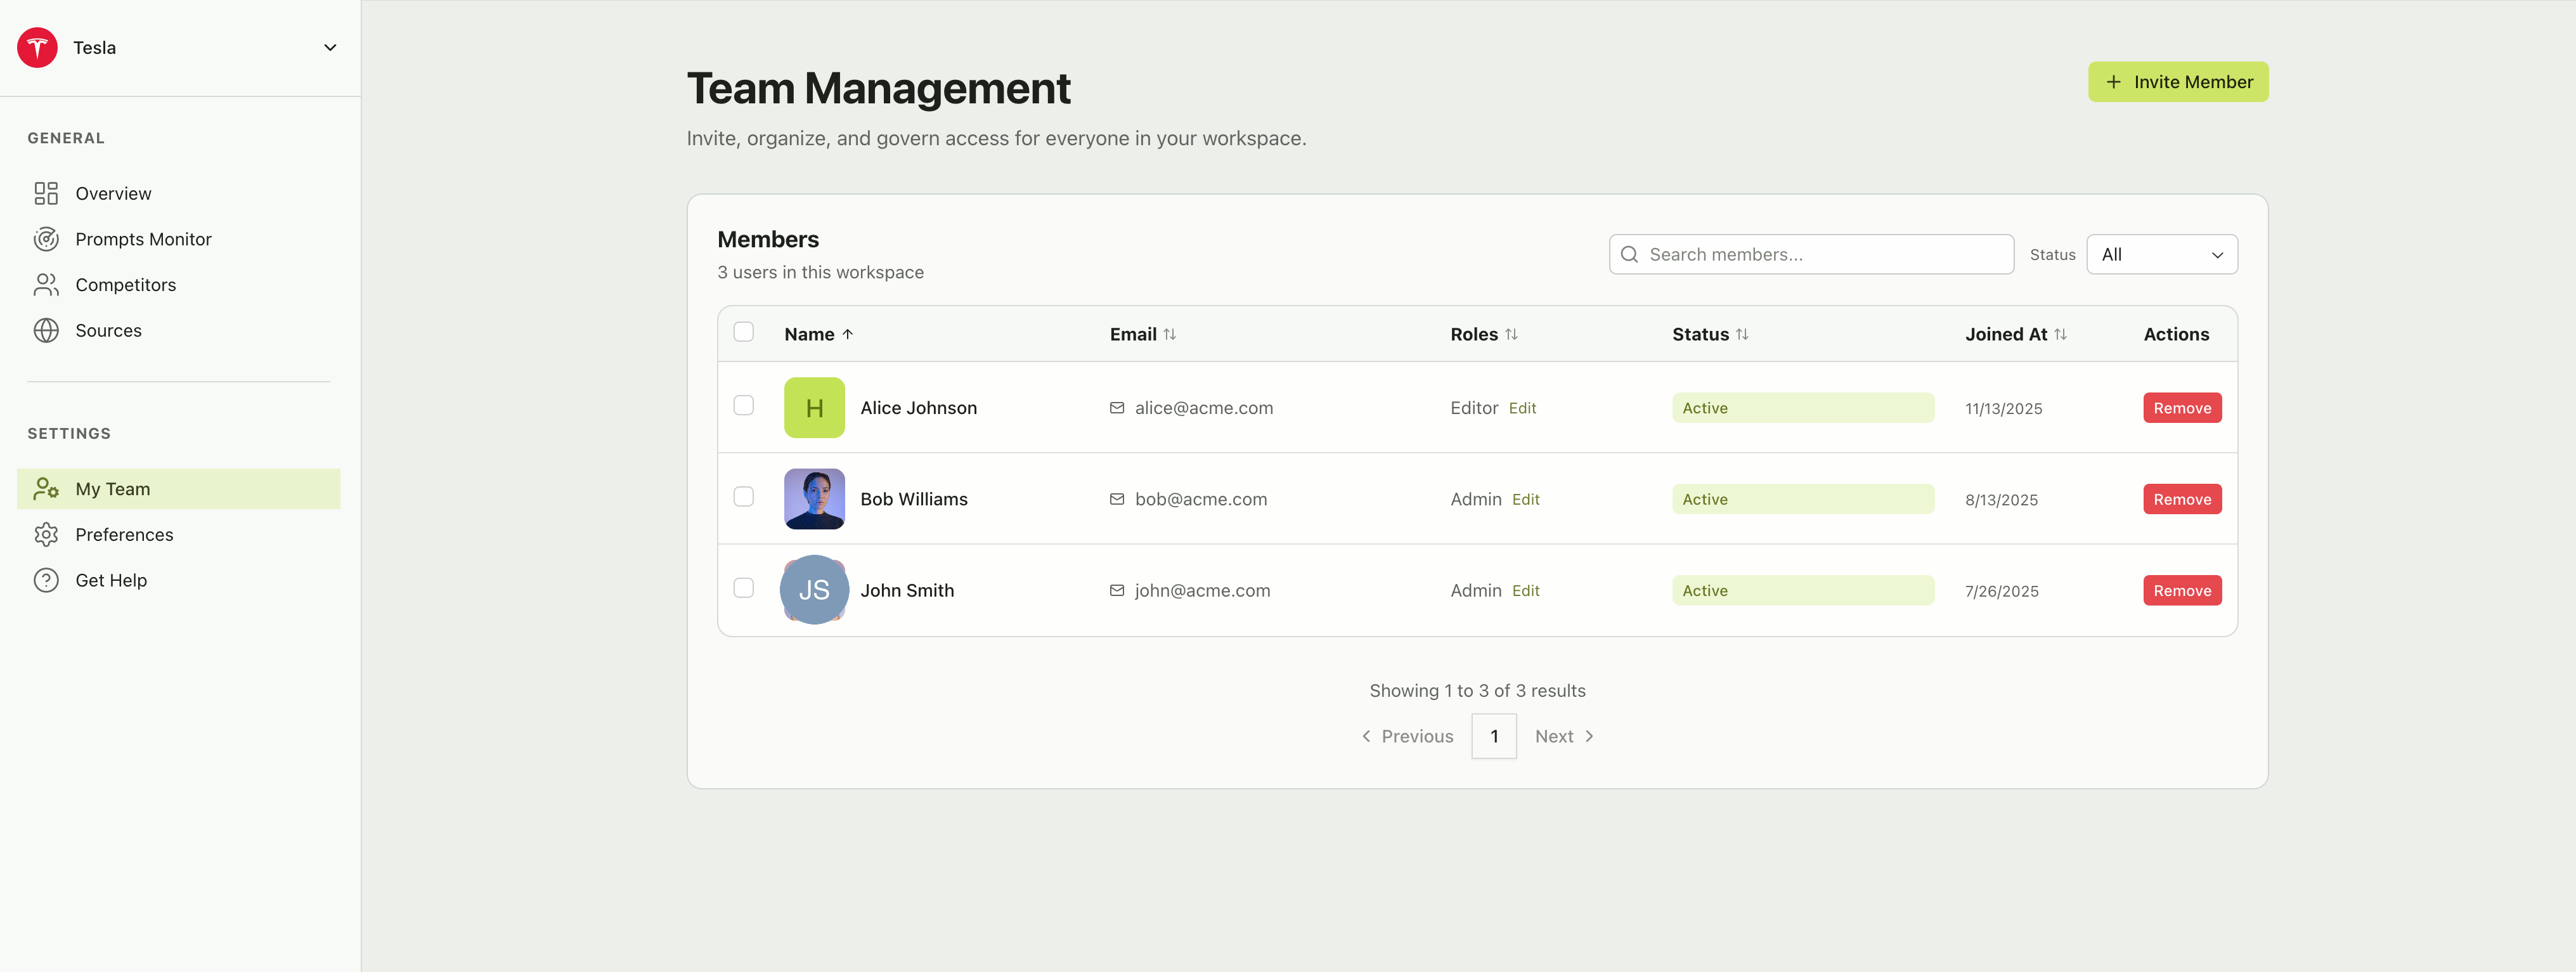
The members table gives you a complete view of everyone in your workspace. Each row includes:
| Column | Description |
| ------------- | --------------------------------------------------------------------------------------- |
| **Name** | The member's display name and avatar |
| **Email** | Their account email address |
| **Roles** | Current role assignment (Admin, Editor, or Viewer) with an **Edit** button to change it |
| **Status** | Whether the member is **Active** or has a **Pending** invitation |
| **Joined At** | The date they joined the workspace |
| **Actions** | A **Remove** button to revoke their access |
You can sort the table by clicking any column header and filter by status using the **Status** dropdown at the top right. The search bar lets you quickly find members by name or email.
## Inviting a new member
Click the **+ Invite Member** button at the top right of the page.
Type the email address of the person you want to invite.
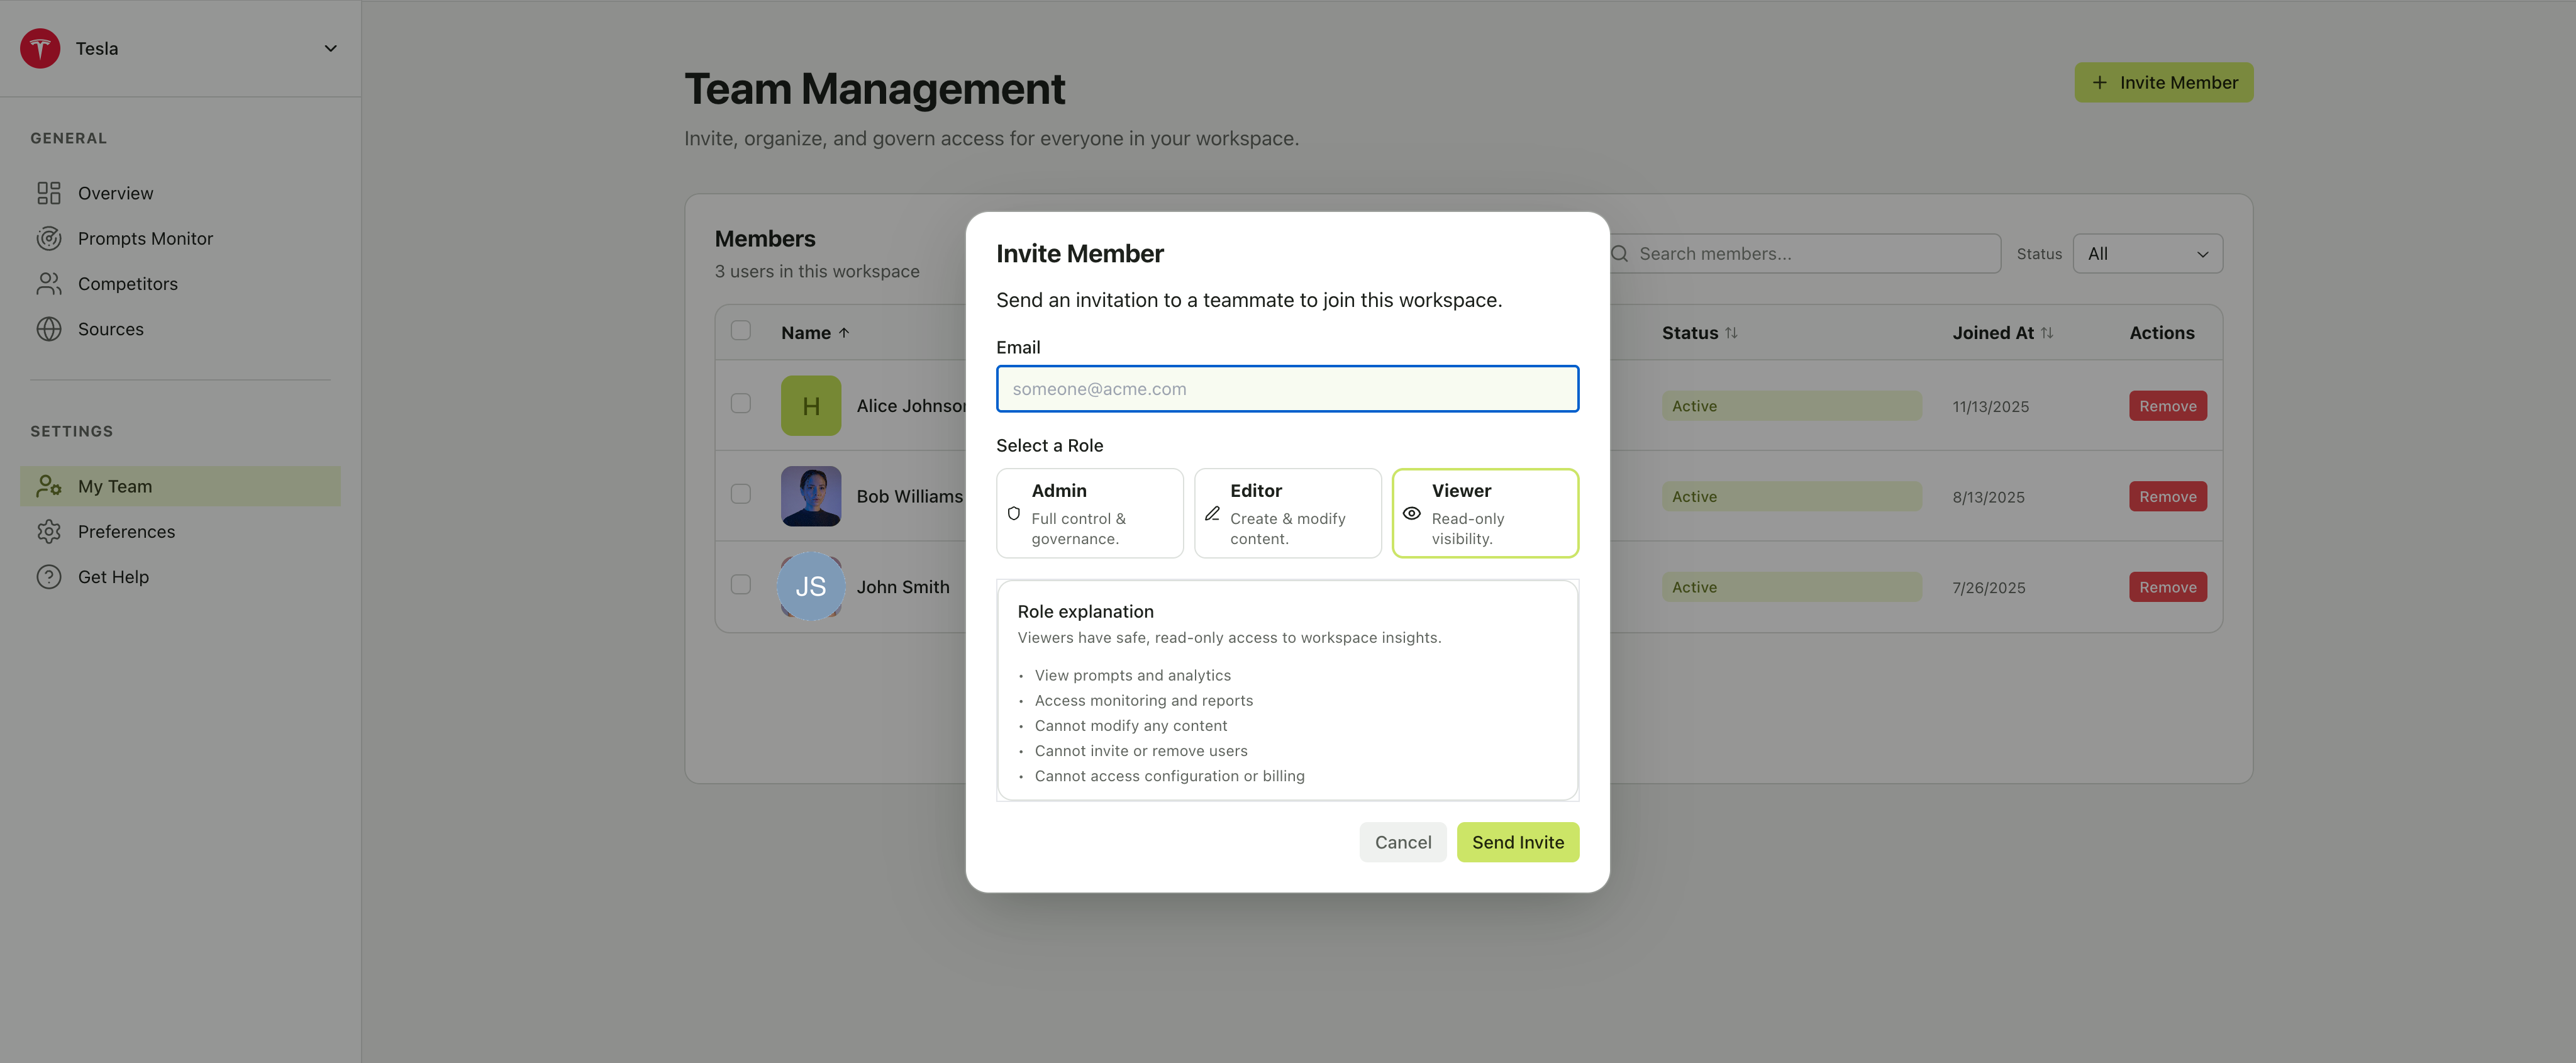
Choose **Admin**, **Editor**, or **Viewer** — each role card shows a brief description, and a detailed explanation appears below your selection.
Click **Send Invite**. The invitee will receive an email with instructions to join your workspace.
## Members table
The members table gives you a complete view of everyone in your workspace. Each row includes:
| Column | Description |
| ------------- | --------------------------------------------------------------------------------------- |
| **Name** | The member's display name and avatar |
| **Email** | Their account email address |
| **Roles** | Current role assignment (Admin, Editor, or Viewer) with an **Edit** button to change it |
| **Status** | Whether the member is **Active** or has a **Pending** invitation |
| **Joined At** | The date they joined the workspace |
| **Actions** | A **Remove** button to revoke their access |
You can sort the table by clicking any column header and filter by status using the **Status** dropdown at the top right. The search bar lets you quickly find members by name or email.
## Inviting a new member
Click the **+ Invite Member** button at the top right of the page.
Type the email address of the person you want to invite.
Choose **Admin**, **Editor**, or **Viewer** — each role card shows a brief description, and a detailed explanation appears below your selection.
Click **Send Invite**. The invitee will receive an email with instructions to join your workspace.
 ## Roles and permissions
Citivus uses three roles to control what each team member can do in your workspace. When inviting or editing a member, the role explanation panel shows exactly what each role grants.
### Admin
Admins have unrestricted access to manage the entire workspace.
* Manage users, roles, and invitations
* Access and modify billing details
* Configure global workspace settings
* Remove any member from the workspace
* Full control over all content and data
### Editor
Editors drive day-to-day content creation and management.
* Create, modify, and organize prompts
* Manage brands and related assets
* Access analytics and monitoring
* Cannot access billing settings
* Cannot invite or remove users
### Viewer
Viewers have safe, read-only access to workspace insights.
* View prompts and analytics
* Access monitoring and reports
* Cannot modify any content
* Cannot invite or remove users
* Cannot access configuration or billing
Choose the most restrictive role that still lets the person do their job. You can always upgrade a role later using the **Edit** button in the members table.
## Changing a member's role
Click the **Edit** button next to a member's current role in the members table. A role selector will appear, allowing you to assign a different role. The change takes effect immediately.
## Removing a member
Click the **Remove** button in the **Actions** column for the member you want to remove. You will be asked to confirm before the member is removed. Once removed, they will lose access to the workspace immediately.
Removing a member is immediate. They will no longer be able to access any workspace data. If you need to restore their access, you'll have to send a new invitation.
## Roles and permissions
Citivus uses three roles to control what each team member can do in your workspace. When inviting or editing a member, the role explanation panel shows exactly what each role grants.
### Admin
Admins have unrestricted access to manage the entire workspace.
* Manage users, roles, and invitations
* Access and modify billing details
* Configure global workspace settings
* Remove any member from the workspace
* Full control over all content and data
### Editor
Editors drive day-to-day content creation and management.
* Create, modify, and organize prompts
* Manage brands and related assets
* Access analytics and monitoring
* Cannot access billing settings
* Cannot invite or remove users
### Viewer
Viewers have safe, read-only access to workspace insights.
* View prompts and analytics
* Access monitoring and reports
* Cannot modify any content
* Cannot invite or remove users
* Cannot access configuration or billing
Choose the most restrictive role that still lets the person do their job. You can always upgrade a role later using the **Edit** button in the members table.
## Changing a member's role
Click the **Edit** button next to a member's current role in the members table. A role selector will appear, allowing you to assign a different role. The change takes effect immediately.
## Removing a member
Click the **Remove** button in the **Actions** column for the member you want to remove. You will be asked to confirm before the member is removed. Once removed, they will lose access to the workspace immediately.
Removing a member is immediate. They will no longer be able to access any workspace data. If you need to restore their access, you'll have to send a new invitation.